SQL Server Backups for Linux
Did you know that SQL Backup Master makes it easy to back up SQL Server databases running on Linux?
Using SQL Backup Master for this task offers a broad range of benefits:
- Provides backup scheduling for SQL Server (including Express edition) on Linux
- Allows database backups to be stored on-site (local folders, network folders, NAS devices, etc.)
- Allows database backups to be stored off-site (FTP, Dropbox, Google Drive, Amazon S3, OneDrive, etc.)
- Provides database backup compression and encryption capabilities
- Provides email notification support for database backup jobs
- Many other features (robust backup logging, retry support, recovery support, etc.)
For details, please see our Backing Up SQL Server on Linux article.
SQL Server Database Backup Compression
SQL Backup Master v4.3 introduced the ability to pass custom parameters to the database backup command that is sent to SQL Server. One example of how this capability can be useful is if you wish to enable SQL Server’s built-in backup compression capability.
Before you begin, though, keep in mind that native backup compression is available only in certain versions and editions of SQL Server. You’ll need the Enterprise or Standard edition of SQL Server 2008 R2 or later to use this feature – it isn’t supported in lesser editions such as Express, Web, etc.
It’s also worth noting that SQL Backup Master’s compression feature will typically yield superior results than SQL Server’s built-in backup compression. However, SQL Server’s backup compression feature has the advantage of requiring less working disk space and in some cases might be a better fit for your backup workflow.
To enable SQL Server backup compression in SQL Backup Master:
- Double-click your backup job in the SQL Backup Master main window
- Click the Backup job settings link
- Select the Database tab
- Enable the Append the following arguments to the backup database command checkbox
- Add the keyword COMPRESSION to the backup database command arguments field
The result is shown in the screen shot below.

Next, you’ll likely want to disable SQL Backup Master’s compression feature. Although you aren’t strictly prohibited from using it in conjunction with SQL Server’s built-in backup compression, you won’t typically see much (if any) benefit from doing so. To disable it, select the Compression & Encryption tab in the backup job settings window and select the Compression Disabled option.
You can now save your changes and execute the backup job. The resulting database backup will have a .bak file extension and should be appreciably smaller than its uncompressed counterpart.
IMPORTANT: We strongly recommend that you run backup and restore tests every time you change your backup job settings – especially when using advanced features like the one described above.
Differential Backup Error: Current Database Backup Does Not Exist
In rare cases, SQL Backup Master may log the following error when attempting to perform a differential database backup:
Failed to create backup: Cannot perform a differential backup for database “XYZ”, because a current database backup does not exist.
This error occurs because the SQL Server backup chain for the specified database is being invalidated. Let’s review possible causes.
Possible Cause #1 – VSS (Volume Shadow Copy Service) Backups
Some third-party backup solutions will take a snapshot of your SQL Server database via the Windows Volume Shadow Copy Service. These snapshots will invalidate the current backup chain, thereby interfering with tools such as SQL Backup Master.
Important: SQL Backup Master 6 and later includes a Backup History report that can help identify when this problem occurs. Select the Reporting tab in the main product window and select the Backup History report. When viewing the report, look for entries that have the Is Snapshot field set to True. These backups are not being created by SQL Backup Master.
VSS creates database backups through a Windows system service called SQL Writer Service. When enabled, this service allows backup applications to copy SQL Server data files while SQL Server is running.
The solution in this case is simple – disable the SQL Writer Service, as follows:
- Press Windows + R keys to open the Run dialog, then type services.msc and press Enter.
- Find the SQL Server VSS Writer service and double-click on it.
- Click the Stop button to stop the service, when change the startup type to Manual.
- Click OK to finish.
When the service has been disabled, use SQL Backup Master to trigger a full database backup to re-establish the state of the backup chain.
Possible Cause #2 – Changing the Recovery Model
If the SQL Server database recovery model has recently changed, you should manually trigger a new full backup in order to reinstate the database backup chain. Once this is done, future differential backups should run successfully.
Possible Cause #3 – SQL Server 2005 Bug
Microsoft knowledge base article #921106 describes a bug in SQL Server 2005 that can cause this problem. The KB article also provides a hot fix.
Still Need Help?
If you’ve reviewed the above causes and solutions are still experiencing this problem, please feel free to contact our support team. We’re always happy to help.
Why You Can Trust SQL Backup Master
When searching for a software solution to a critical business problem, trust matters tremendously. This is especially true for database backup software. After all, what good is a SQL Server backup solution if you can’t be confident in the integrity of the backups it creates?
In this article, we’ll examine the transparent operational nature of SQL Backup Master, the established company behind it, and your essential role in ensuring backup chain confidence.
SQL Backup Transparency
One of SQL Backup Master’s greatest strengths is its transparent, non-proprietary approach. SQL Backup Master leverages SQL Server’s native backup capabilities to create standard database backup files. It then compresses (and optionally encrypts) these backups using the compression algorithm of your choice (or none at all, if you prefer) and uploads them to your configured backup destination(s).
What this means for you: you’re never locked into using SQL Backup Master when recovering a database from backup. While SQL Backup Master offers a streamlined database recovery option, it isn’t performing any operations you couldn’t do manually if necessary. In fact, manual recovery is straightforward:
- Download the backup file from your backup destination
- Decompress it using readily available tools
- Restore the database directly via SQL Server (using SQL Server Management Studio or SQL statements)
This point cannot be overstated—SQL Backup Master enhances the SQL Server database backup process without limiting your flexibility. Just as importantly, your database recovery process isn’t trapped behind an expensive licensing paywall from a third-party vendor. Your data remains your data, exactly as it should be.
Pedigree of Key Metric Software
When choosing a database backup solution, the reputation of the company behind it matters significantly.
Key Metric Software has been in continuous operation since 2003 and has developed numerous highly regarded software products—all actively maintained and supported. We serve over 50,000 paid customers (plus many more using free versions of our products) across the globe, backed by our world-class support services.
Key Metric Software’s mission has always been to create exceptional value for organizations of all sizes, and SQL Backup Master represents a cornerstone of that vision.
Your Role in Database Backup Security
Confidence in your SQL Server backup and recovery strategy ultimately begins and ends with you.
When evaluating a database backup solution, thoroughly test the entire backup chain from creation to recovery. Plan to re-test this chain periodically to maintain ongoing security and confidence.
Remember: a database backup is only valuable if it can be successfully recovered when needed.
Troubleshooting Operating System Error 3
Some users of SQL Backup Master may encounter the following error when executing a database backup job (or testing one during the configuration process):
Job Execution Error: Cannot open backup device ‘<Path>’ Operating System error 3 (The system cannot find the path specified. BACKUP DATABASE is terminating abnormally).
The key to solving this problem is to first understand that SQL Server must be able to write database backup files directly to the temporary backup folder location specified in your backup job settings.
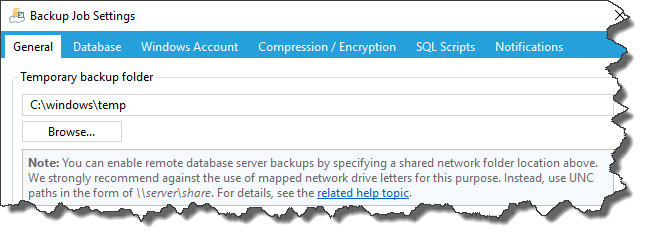
When SQL Server cannot access this temporary folder location, the database backup file cannot be created and the process fails with “Operating System error 3”. Now let’s look at possible underlying causes.
Possible Cause #1 – Permissions
Regardless of how you configure a backup job within SQL Backup Master, SQL Server itself runs within the security context of the account specified in the SQL Server system service configuration. To find out which account is being used click Start, click in the Start Search box, type services.msc, and then press ENTER.
Find your SQL Server instance in the services list and double-click it, then select the Log On tab.
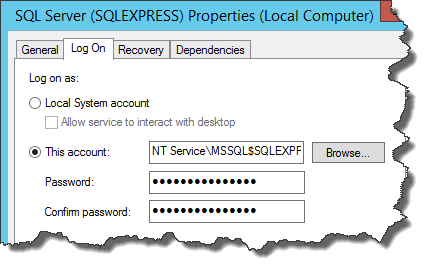
It is this “log on” account that must have sufficient permissions to write to the temporary backup folder location. Check the permissions on the temporary backup folder by right-clicking it in Windows Explorer, selecting Properties, then navigating to the Security tab. Make sure that the account SQL Server is using has explicit read/write permissions for this folder.
Also, here’s a quick tip. If you’re uncertain as to whether folder permissions are at the root of your problem, just temporarily give “everyone” full permissions to it. If your backup job tests and executes successfully after doing so, you’ll have confirmed that permissions problem are the root issue and can narrow them down from there.
Possible Cause #2 – Mapped Drives
If you’re attempting to specify a backup folder location that resides on a remote (network ) file system, we strongly recommend that you do not use a mapped drive letter for this purpose. In Windows Vista and later, mapped drive letters are bound to the Windows security context that was used to create them, and SQL Server will usually not be able to access the mapping for this reason.
The solution to this problem is simple: use a fully qualified UNC path instead of a mapped drive letter. So, for example, instead of using “Z:\DBBackups” (where Z is the mapped drive letter), specify a fully qualified UNC path such as “\\remote-server\DBBackups”.
Possible Cause #3 – Lack of Domain Trust
If your SQL Server instance and your database backup folder are on computers in separate Active Directory domains, then a missing or expired trust between the domains may cause this problem – even if the file system permissions are configured appropriately.
You can resolve this issue by ensuring that a trust between the two domains is established. You may also need to configure the SQL Server service account with pass-through authentication between the domains.
Conclusion
When using SQL Backup Master, “Operating System Error 3” is an indication that SQL Server is unable to write to the temporary backup folder location specified in your backup job settings.
If you need further assistance with troubleshooting this problem, please don’t hesitate to open a support request with us. We’re happy to help.
Back Up SQL Server Databases to an FTP Server
Looking for a quick way to back up SQL to FTP? With SQL Backup Master, you can easily automate and schedule backups to standard FTP, FTPS (TLS/SSL), or SFTP servers. Follow the steps below to configure and run your backup job, ensuring your data is kept safe offsite.
Step 1 – Create a Backup Job
In the main SQL Backup Master window, select the Backup and Restore tab, then click the Create new database backup toolbar button. The Database Backup Editor window will appear.
Give your backup job a unique name (and optionally a description). This makes it easier to identify in the future.
Step 2 – Connect to SQL Server
In the Database Backup Editor window, click the Choose SQL Server button. This will open the Connect to SQL Server dialog box:
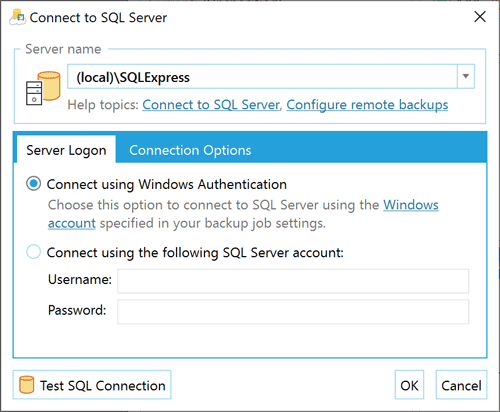
In the Server name field, enter or select the name of the SQL Server instance to which you’re connecting. Common examples include:
- (local)\SQLExpress – The default SQL Express named instance on the local computer.
- (local) – The local SQL Server installation without an instance name.
- Server1\SQLExpress – The default SQL Express named instance on a remote computer named “Server1.”
- Server1 – An unnamed SQL Server instance on a remote computer named “Server1.”
TIP: You can also use the drop-down arrow of the Server name field to discover local and remote SQL Server instances. When ready, click Test SQL Connection to verify connectivity, then hit OK.
Step 3 – Select Databases to Back Up
Once you’re connected, the Database Backup Editor window displays a list of databases. Check the boxes for the databases you want to include in this backup job.
If you enable the Back up all non-system databases option, any new database created on the target SQL Server in the future will be included in backups automatically.
Step 4 – Add an FTP Server Backup Destination
Under the Destinations heading in the Database Backup Editor, click the Add toolbar button. The Choose Destination window will appear. Double-click FTP Server to proceed.
The FTP Destination Settings window will open. Provide details about the FTP server you want to use (such as the server host address, username, and password). You can also configure advanced settings for FTPS, SFTP (via SSH), or specific proxy options like SOCKS4 or SOCKS5.
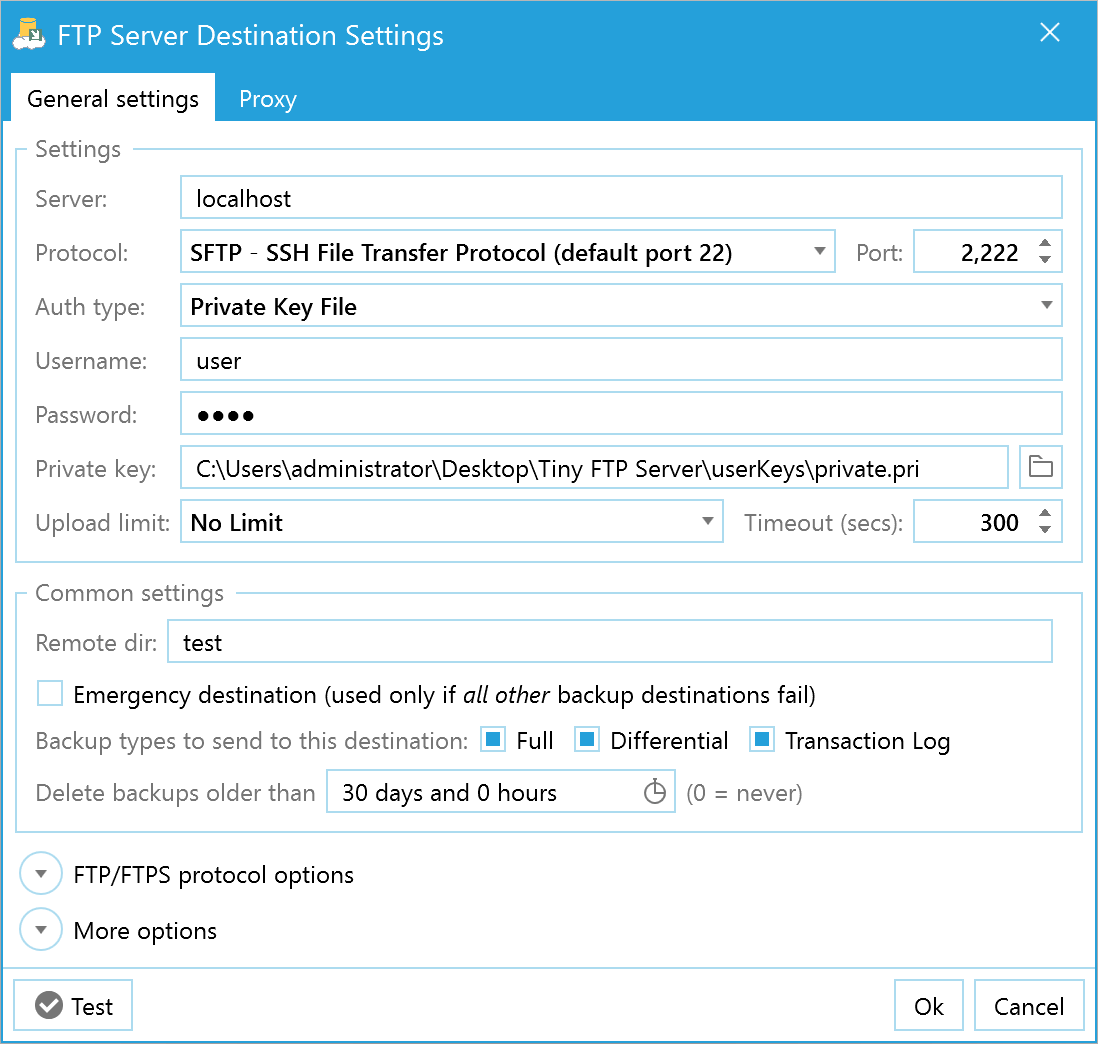
Click the Test button to ensure SQL Backup Master can connect and upload to your FTP server. Once configured, click OK to return to the Database Backup Editor window. Finally, select Save to store your new backup configuration.
Congratulations! You’ve successfully configured your first SQL Server database backup using SQL Backup Master and an FTP Server destination.
Step 5 – Run the Backup Job
Back in the main application window, locate your newly created backup job and click Back up now to begin the process. If the job does not complete successfully, check the log file for detailed error information.
That’s it! You are now backing up your SQL database to FTP. By automating backups with SQL Backup Master, you’ll have peace of mind knowing your critical data is protected offsite and readily available for recovery.
If you’re looking for additional backup destinations—such as Dropbox, OneDrive, or Amazon S3—be sure to explore the full feature set of SQL Backup Master by Key Metric Software.
SQL Backup Master v3.1 Now Available
Today we’re releasing SQL Backup Master v3.1. It offers a number of improvements and bug fixes, including important changes to Dropbox support.
Dropbox recently announced that “version 1” of their service API (application programming interface) is now deprecated, and will be shut down on June 28th, 2017. Since SQL Backup Master v3.0 and earlier make use of Dropbox API v1, those installations will no longer be able to interface with Dropbox after the announced shut down date.
For SQL Backup Master v3.1, we have updated Dropbox support to use their latest service APIs. For this reason, we encourage any SQL Backup Master users that rely on Dropbox integration to upgrade prior to June of 2017.
For more information on what’s new in SQL Backup Master v3.1, please see the full product release notes.
SQL Backup Master 3 is Released
Key Metric Software is proud to announce the release of SQL Backup Master 3.
This new version contains many powerful new features, including:
– Support for SQL Server 2016
– Support for OneDrive as a backup destination
– Failed backup job retry (built into the scheduler)
– The ability to bypass database file compression
– New multi-core ZIP compression subsystem
– Improved (and more granular) notifications
– Extensive FTP/SFTP proxy support
– Numerous improvements to Amazon S3 support
– And much more
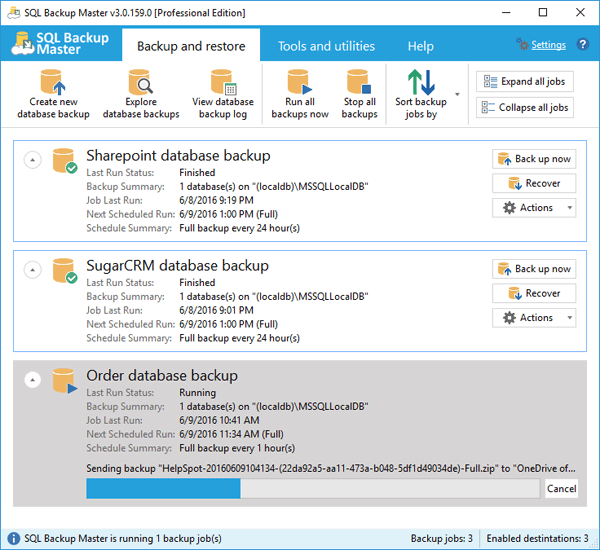
You can read more about the new SQL Backup Master release here:
https://www.sqlbackupmaster.com/features/whatsnew
Or download the new release now:
https://www.sqlbackupmaster.com/download
IMPORTANT: If you’re licensed for a previous version of SQL Backup Master and are interested in upgrading to this new release, you’ll need to upgrade your license before installing the new release. If you install the new version without upgrading your license first, it will revert to the features and functionality of the free version.

